
Table of Contents:
Hardware Packaging Needs: Protection, Access, and Product Fit
Hardware packaging must perform three jobs at once: prevent damage, keep the product easy to reach, and hold every part in the right position. A box that looks strong but lets a drill bit, fitting, or cable move freely is not a sound design. Movement creates scuffs, noise, broken edges, and sometimes hidden faults.
Start with the product, not the artwork. Record its length, width, height, weight, sharp points, fragile surfaces, and natural grip areas. Then map how people will handle it. A heavy motor component needs a low centre of gravity and lift clearance. A small screw kit needs compartments or a sealed inner pouch so parts do not scatter. Electronics may also require separation between the device, cable, charger, and printed instructions.
Fit should be secure without becoming hostile. The product should not rattle during transport, yet the customer must be able to remove it without pulling, shaking, or using a knife near sensitive parts. Finger cut-outs, pull tabs, hinged supports, and staged opening panels can make a big difference. For repair kits, place the first-use items near the opening. For tool sets, show the storage logic clearly: one cavity, one component, one obvious home.
Protection depends on the expected risks. Consider compression from stacked cartons, vibration in trucks, drops during warehouse handling, moisture, dust, and repeated opening. Heavy items need load-bearing supports rather than decorative padding. Fragile parts benefit from isolated cavities, soft contact points, and clearance around exposed surfaces. Sharp metal edges should never press directly against a printed outer panel.
- Small fasteners: use divided compartments, sealed bags, or a lidded inner tray.
- Hand tools: secure handles and metal heads separately to prevent shifting.
- Electrical accessories: prevent cable bends, connector impact, and contact with abrasive surfaces.
- Automotive parts: block movement at heavy points and protect coated or machined faces.
- Maintenance kits: combine clear sequencing with quick access to frequently used pieces.
Design the opening sequence as carefully as the closed box. A strong package can still fail if the user tears it apart to reach the product. Ask practical questions: Can a gloved worker open it? Can the item be removed with one hand? Can unused pieces remain organised after the first opening?
Before approving production, test the actual packed unit. Check for movement, crushed corners, loose inserts, difficult removal, and damage after realistic handling. A useful trial includes repeated openings, vibration, stacking, and controlled drop checks. Record the result for each product version; small changes in weight or geometry can alter the package response.
The best hardware package is quiet in transit, quick to open, and obvious to use. It protects the product without burying it in excess material. That balance is the real craft of hardware packaging design.
Choosing Boxes, Trays, Blisters, and Clamshells
The right format depends on the product, sales channel, opening method, and production volume. No single package suits a steel fitting, a cordless tool, and a delicate circuit board. Choose the structure first; add decoration only after the pack has earned its place.
Folding cartons work well for light hardware, accessories, cable sets, drill bits, and compact repair kits. They ship flat, use efficient shelf space, and support strong printed communication. Add a hanging tab for pegboard retail or a locking base for faster packing. A small viewing panel can help shoppers identify the item, but it should not weaken a load-bearing fold.
Corrugated boxes suit heavier tools, motors, bundled parts, and products that travel through parcel networks. Flute choice affects compression, cushioning, and print quality. Fine flutes create a smoother surface for graphics; larger flutes offer more resilience. Avoid choosing board grade by weight alone. A dense, compact product can place far more stress on one corner than its total mass suggests.
Rigid boxes fit premium tool sets, specialist components, and gift-led hardware ranges. Their strong walls create a firm presentation and can support a hinged lid, magnetic closure, or layered interior. They cost more and take more storage space, so reserve them for products where perceived value and repeated use justify the extra structure.
Trays are useful when the package must sort several components. A pulp tray suits a lower-impact material strategy, while a thermoformed tray can create precise cavities for irregular items. Thermoformed PET, PP, or recycled-content plastics may offer clear geometry and repeatable fit, but the material choice should match recycling access in the target market.
Blister packs combine a formed plastic pocket with a printed card. They make small products visible and difficult to remove without opening the pack, which can help at self-service retail. Their limits are clear, too: they offer little room for bulky tools, can be awkward to open, and may create sharp plastic edges after separation.
Clamshells enclose the product between two formed halves. They provide broad visibility and strong tamper evidence, making them useful for compact accessories, fittings, and small tools. A hinged design can support reuse, but heat-sealed versions may frustrate customers. If opening requires cutting, include a safe opening path and keep the blade away from the product.
- Choose a folding carton for light, compact items with a high need for printed information.
- Choose corrugated board for weight, stacking, parcel shipment, or rough handling.
- Choose a rigid box when presentation and long-term reuse support a premium price.
- Choose a tray when many parts need a neat, visible arrangement.
- Choose a blister for small retail items that benefit from direct visibility.
- Choose a clamshell when full enclosure and tamper evidence matter.
Do not compare formats only by unit price. Compare packed volume, tooling, assembly time, shelf footprint, material recovery, damage rates, and customer effort. A cheaper pack that doubles packing labour or causes returns is not cheaper in practice.
Comparing Hardware Packaging Formats
| Packaging Format | Best For | Main Advantages | Limitations |
|---|---|---|---|
| Folding Carton | Light hardware, accessories, cable sets, and repair kits | Ships flat, uses shelf space efficiently, and offers ample room for printed information | Limited protection for heavy or highly fragile products |
| Corrugated Box | Heavy tools, motors, bundled parts, and parcel shipments | Provides strong compression resistance, cushioning, and protection during transport | Requires more storage space and may need internal inserts |
| Rigid Box | Premium tool sets and specialist hardware | Creates a durable, high-value presentation and can support reuse | Higher cost, greater weight, and increased storage requirements |
| Tray | Multi-component kits and irregularly shaped products | Keeps parts organised and provides precise product positioning | May require an additional outer carton for protection and branding |
| Blister Pack | Small retail hardware and visible accessories | Offers direct product visibility and tamper resistance | Can be difficult to open and offers limited space for bulky products |
| Clamshell | Compact tools, fittings, and small accessories | Provides full enclosure, broad visibility, and clear tamper evidence | Heat-sealed versions may frustrate customers and create sharp edges when opened |
Designing Inserts for Tools, Parts, Kits, and Electronics
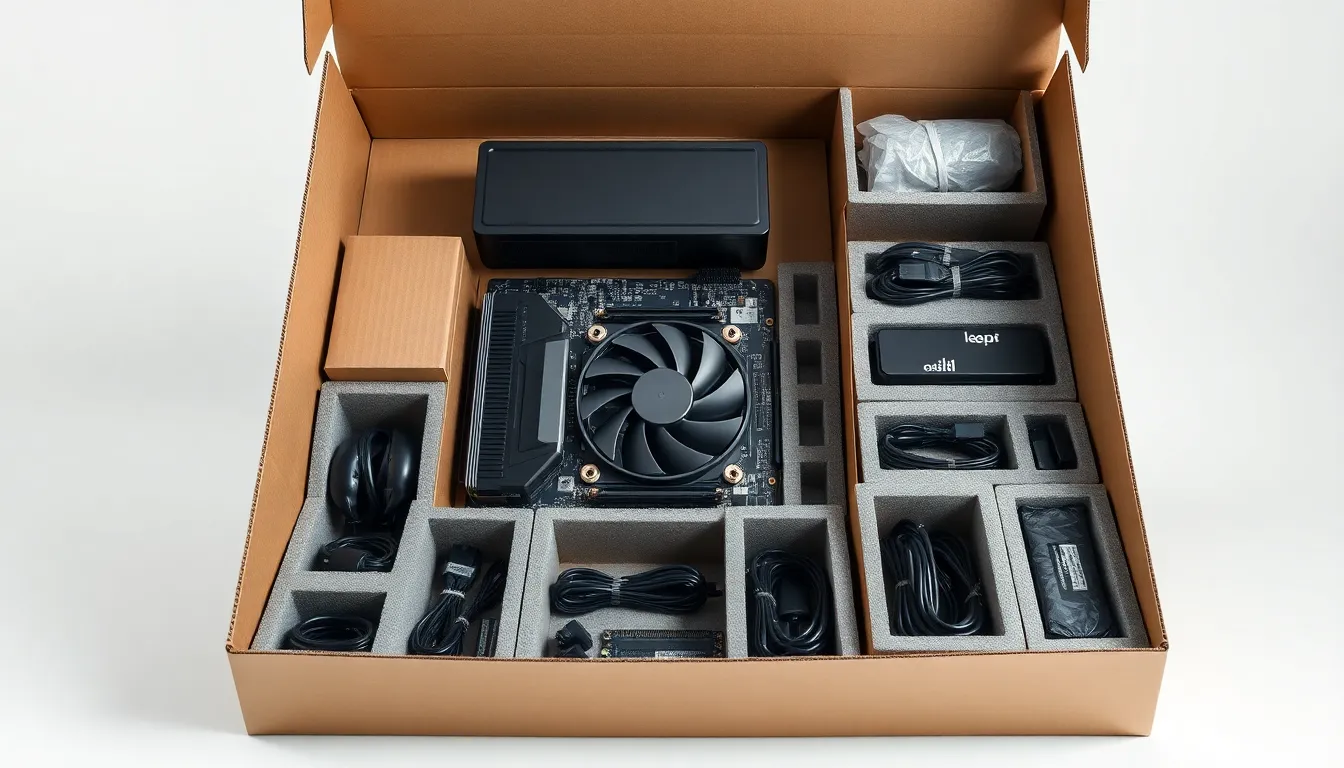
An insert turns an empty package into a deliberate storage system. Its job is not only to fill space. It should guide each item, separate materials that may mark one another, and make the contents easy to identify after opening.
For tools, begin with contact zones. Support the handle, shaft, head, or battery area where the product can tolerate pressure. Keep delicate finishes, cutting edges, switches, and polished surfaces away from hard seams. A shaped insert can also stop a tool from rotating inside the pack, which is especially useful for long or uneven products.
Parts and fittings need a different logic. Group components by function, size, or installation order. Small cavities can prevent mixing, while a broad recess may suit a larger manifold or connector. Add simple visual cues, such as printed cavity numbers or short part names, when several pieces look alike. This saves time on a busy worksite.
For kits, use hierarchy rather than a flat pile. Place the main item in the first layer and supporting pieces below it or in a removable secondary section. A lift ribbon, thumb notch, or folding access flap can reveal the next layer without damaging the insert. The arrangement should explain itself within seconds.
Electronics require attention to static control, cable routing, and accessory separation. A device should not share a tight cavity with a power adapter if the adapter can press against its housing. Keep connectors from snagging on pulp fibres or rough cut edges. Where electrostatic discharge is a concern, specify an appropriate conductive or dissipative material instead of assuming that ordinary foam is enough.
- Die-cut paperboard: useful for light products, layered kits, and recyclable fibre-based structures.
- Molded pulp: suitable for shaped cavities and low-plastic concepts, though surface texture needs review.
- Foam: effective for delicate surfaces and high-value equipment, with careful attention to ageing and recycling.
- Thermoformed plastic: precise for repeated shapes and clear cavity definition.
- Corrugated fitments: practical for heavier products and efficient shipping packs.
Do not make every cavity tight. Provide finger clearance around removable parts, especially when users wear gloves. Keep labels visible after the first item is removed. If the insert is meant to return to the package, its orientation should be obvious; a lopsided fit creates needless friction.
Material compatibility matters as well. Oils, lubricants, rubber compounds, and coated metals can react with some foams, inks, or adhesives during storage. For electronic products, review outgassing, abrasion, and humidity exposure. A short compatibility check can prevent a costly surprise months later.
The most effective insert feels almost invisible. Every recess has a reason, every layer follows a sequence, and the customer can repack the product without guesswork.
Matching Packaging Strength to Weight and Handling
Packaging strength should match the full handling chain, not just the product’s mass. A 2 kg metal assembly may need more structural support than a larger, lighter plastic item because its concentrated load can crush panels, split seams, or deform a base.
Start by defining the handling profile. Will the pack move through parcel networks, pallets, retail shelves, workshops, or all four? Each route creates different stresses. Parcel shipping brings drops and impacts. Pallet storage brings compression. A hardware counter may involve repeated lifting, stacking, and quick repositioning by hand.
Weight distribution matters as much as total weight. A long tool creates leverage at the ends. A dense motor places strong pressure on a small footprint. An off-centre component can make a carton tip when lifted. Place load-bearing folds, seams, and supports where force actually travels through the package. Decorative panels should not carry structural work by accident.
Use measurable performance targets instead of vague claims such as “heavy duty.” Common packaging tests include edge crush testing, box compression testing, vibration testing, and controlled drop testing. The required level depends on distribution conditions, product fragility, stacking height, and shipment distance. A laboratory result is useful only when the test reflects real handling.
- Compression: checks whether stacked cartons buckle or collapse over time.
- Impact: reveals weak corners, closures, and internal load paths.
- Vibration: exposes gradual rubbing, loosening, and fastener movement.
- Humidity: shows how moisture affects fibre strength, adhesives, and labels.
- Repeated handling: measures whether handles, tabs, and closures survive normal use.
For corrugated designs, board strength is only one part of the calculation. Panel size, score direction, joint placement, and stacking orientation can change performance sharply. A short package with a strong base may outperform a taller carton made from a heavier grade. Keep unsupported spans modest, especially beneath dense products.
Closure design deserves equal attention. Tape, tuck flaps, locking tabs, and adhesive seams each behave differently under tension and humidity. A package that opens cleanly in a store must still resist accidental opening in transit. For heavier units, add a carrying method that transfers force into the strongest panels rather than into a thin lid.
Do not overbuild by default. Extra board, foam, or plastic raises cost, shipping weight, and environmental impact. Instead, strengthen the failure point: a corner pad, folded bearer, reinforced handle, or better pallet pattern may solve the problem with far less material.
Document the final specification in practical terms: packed weight, maximum stack height, orientation marks, storage temperature, humidity limits, and approved handling method. Clear limits help warehouses and carriers treat the package as designed, not as an anonymous carton.
Creating Clear Product Organization and Easy Access
Clear organisation reduces search time at the shelf, in the warehouse, and on the workbench. For hardware, the package should communicate its internal logic before every component is removed. A worker should know where to find the main item, the matching accessory, and the small parts without turning the carton upside down.
Use a simple information hierarchy. Put the primary product first, supporting parts second, and instructions where they remain visible. Group items by task rather than by appearance alone. For example, a plumbing repair kit may separate sealing parts, connectors, and tools into distinct zones. That arrangement supports the job itself, not just a tidy photograph.
Labels must survive real use. Print short names, quantities, sizes, or part codes beside the relevant location. Use large enough type for workshop lighting and avoid placing critical information under a flap or beneath a removable item. Colour can support recognition, but never make colour the only code; lighting, dust, and colour-vision differences can turn a clever system into a muddle.
- Use numbered stages for installation or repair kits.
- Place high-frequency items closest to the opening.
- Keep small parts in locations that remain visible after removal.
- Repeat key part codes on the insert and the product label.
- Leave a clear place for instructions, safety notes, or a return component.
Design for the point of use. A package opened in a clean retail setting may later sit on a dusty service bench. Hinged lids, resealable pouches, and removable trays can help preserve order during a job. For sets with loose fasteners, provide a temporary holding area rather than expecting users to balance parts on the carton flap.
Accessibility also includes visibility and grip. Avoid deep, narrow pockets that hide components. Add a pull point to low-profile items and give users enough clearance to grasp gloves or oily fingers. If the box has several layers, mark the lift direction with a quiet arrow or short instruction.
Consider stock control as well. A readable SKU, batch field, barcode, or QR link can support picking and replenishment. The code should sit on a stable, scannable panel, away from folds, glare, and areas likely to be covered by tape. For service products, a small space for date or job notes may improve traceability without adding another label.
The strongest organisation is self-explanatory. The user sees the sequence, understands the labels, removes what is needed, and can restore the remaining contents with little thought.
Using Industrial, Modern, Minimal, or Premium Visual Styles
Visual style should signal what the product is, who it serves, and why it deserves attention. For hardware, the graphic language must feel credible at a glance. A beautiful surface cannot rescue a confusing message, but a disciplined design can make a technical item look deliberate rather than anonymous.
Industrial styling suits workshop tools, fittings, machine components, and trade supplies. Use measured grids, strong alignment, technical diagrams, and restrained specification panels. The result should feel capable, not theatrical. Avoid adding fake gauges, random bolts, or decorative warning stripes; visual noise can make genuine safety information harder to notice.
Modern styling creates a sharper retail presence. Generous spacing, crisp geometry, and controlled image crops can make even a familiar accessory feel current. A single angled graphic or clear product silhouette often works better than several competing effects. Keep the layout adaptable across cartons, labels, online thumbnails, and display cards.
Minimal styling removes anything that does not help recognition or choice. Limit the number of typefaces, icons, finishes, and claims. Let one product image, one benefit, and one identifying code lead the front panel. This approach is especially effective for professional buyers who want answers quickly, though it should not become so sparse that size, compatibility, or contents disappear.
Premium styling relies on restraint and tactile detail. Dark tones, fine line work, subtle contrast, and selective foil or embossing can suggest precision. Use these effects on meaningful areas such as a logo, model name, or technical mark. Covering every panel in gloss, metallic ink, or heavy texture usually weakens the impression.
Typography carries much of the brand character. A sturdy sans serif can support an industrial range, while a refined grotesque or humanist typeface may suit specialist equipment. Set technical data in a clear secondary system. Check numerals, decimal points, units, and letter spacing at actual print size. A misread model number is not a small design flaw.
- Define a visual rule for product names, model numbers, and compatibility data.
- Use one repeatable image treatment across the product family.
- Reserve high contrast for essential information and action points.
- Keep decorative effects away from warnings, barcodes, and legal copy.
- Test the design beside competing products, not only on a clean presentation board.
Build a style system rather than a single impressive box. Decide how colours, icons, photography, diagrams, finishes, and product tiers will behave across the range. A consistent system helps shoppers recognise related items while allowing different tools or component groups to remain distinct.
Finally, review the package in ordinary conditions: warehouse light, a crowded shelf, a phone screen, and a quick online search. Industrial, modern, minimal, and premium are not rigid categories. The strongest hardware packaging borrows the right cues from each, then keeps the message sharply focused.
Selecting Colors, Graphics, Labels, and Retail Displays
Colour, graphics, labels, and displays should help shoppers identify the right hardware in a few seconds. The strongest system works across a box, a pegboard hook, a shelf strip, and a small online image without losing its meaning.
Assign colours by product family, application, or performance level. For example, one colour may mark plumbing parts while another identifies electrical accessories. Keep the system stable across every item. Do not let a seasonal shade change the meaning of a category. Use colour as a support layer, not as the sole way to distinguish products.
Graphics should answer practical questions. A clear line drawing can show thread direction, mounting position, connector type, or compatible surface more accurately than a lifestyle photograph. Use photography when scale, finish, or use context matters. Keep diagrams simple and label only the features that influence purchase or installation.
Labels need an information order. Put the brand and product name where the eye lands first. Follow with the model, size, quantity, compatibility, and a short benefit. Place safety statements, recycling marks, country-of-origin data, and required regulatory information in a readable area, not in microscopic type at the bottom.
- Show the exact product type, such as hinge, bit set, cable gland, or replacement filter.
- State size, thread standard, voltage, load rating, or pack count where relevant.
- Use icons only when their meaning is familiar or explained nearby.
- Keep barcodes and QR codes on flat, high-contrast surfaces.
- Leave space for batch codes, date marks, or retailer labels.
Retail displays need a separate plan. A counter display should hold its shape after repeated product removal. A floor display needs a stable footprint, clear sight lines, and a refill method that does not disturb the front row. Pegboard packaging should keep the hanging point strong and place the product name above the visual clutter of the shelf.
Build displays around shopper flow. The top section can carry the category or range message. The middle zone should present the product and its main reason to buy. The lower zone can hold specifications, pack counts, or a short comparison. Avoid filling every available surface.
Consider colour accuracy and print conditions before approval. Kraft board, coated carton, recycled fibre, and plastic labels can produce different results from the same artwork. Request physical colour proofs for critical brand tones, then inspect them under retail lighting. Metallic inks, varnishes, and matte finishes may also alter contrast or barcode readability.
Finally, assess the full shelf scene. Check whether the package is recognisable from three metres away, whether neighbouring products compete with its key message, and whether the display still looks orderly after several units are removed. Good retail packaging does not merely decorate hardware; it creates a fast, reliable route from recognition to choice.
Building Packaging for Hardware, Automotive, and Industrial Products
Packaging for hardware, automotive parts, and industrial products must reflect the product’s working environment. A replacement sensor, a threaded fitting, and a cast-metal component may share a sales channel, but they face different risks, handling routines, and information needs.
For general hardware, build the pack around category logic. Fasteners need clear count and size communication. Plumbing accessories need thread type, connection method, and material details. Tool kits need a visible contents map and a format that works in a workshop, not only on a retail shelf. Keep product families consistent, but give each category its own practical information structure.
Automotive parts demand tighter control of identification. A package should distinguish left and right versions, front and rear applications, model-year limits, and compatible systems where relevant. Include the part number in more than one visible location. Service technicians often handle a package away from the original display, so the identity must remain clear after outer cartons are removed.
Machined surfaces, painted panels, seals, and sensors also require different contact strategies. Use non-abrasive separation for finished metal. Keep oils and elastomers away from materials that may stain or soften them. For electronic automotive components, control static exposure and prevent connector pins from touching loose fibres, dust, or conductive surfaces.
Industrial products often travel through longer and less predictable routes. They may move between a manufacturer, distributor, service depot, and plant before installation. Add durable handling marks, orientation symbols, storage limits, and lifting guidance where the product requires it. These details should be printed or applied in a way that remains legible after normal warehouse contact.
- Hardware: prioritise size, count, compatibility, and fast identification.
- Automotive parts: make fitment, orientation, and part identity unmistakable.
- Industrial components: support traceability, storage control, and safe movement.
- Machined items: isolate surfaces that can scratch, stain, or corrode.
- Service products: allow the package to function as a temporary work organiser.
Industrial supply chains also benefit from modular packaging. A shared outer case with replaceable inserts can support several component sizes without creating a new full package for every variant. This reduces artwork changes, simplifies storage, and helps distributors manage a wider range. The insert, label, and product code then carry the variation.
Export planning deserves attention before the structure is fixed. Packaging may affect freight class, customs classification, tariff exposure, and the number of cartons per pallet. Verify required marks and documentation for each destination. Rules vary by market and product type, so confirm them with the relevant authority or a qualified trade specialist rather than guessing.
For these sectors, packaging is part of the technical system. It identifies the component, supports the supply chain, and prepares the user for correct installation. When those roles work together, the package becomes a useful piece of equipment in its own right.
Using Prototypes to Test Fit, Protection, and Production
Prototype work should answer practical questions before a production tool is made. Does the package assemble correctly? Can a packing operator load it at a steady pace? Does the chosen artwork fit the panels, folds, seams, and viewing areas? A prototype turns assumptions into visible evidence.
Begin with a low-cost structural mock-up. Plain paperboard, corrugated board, or a digital cutting file can reveal errors in panel proportions, closure movement, and insert placement. At this stage, focus on geometry and sequence. Do not spend time on luxury finishes before the basic form behaves properly.
The next model should represent the intended material and manufacturing method more closely. Check scoring, creasing, forming angles, adhesive zones, weld points, and tolerances. A screen drawing may show a perfect cavity, while the real material introduces spring-back, edge distortion, or small shifts between parts.
Test the complete packing operation. Give the sample to the person who will fill it, close it, label it, and place it into a shipping case. Record the time for each action. Watch for reversed components, awkward rotations, adhesive contact, and steps that require unusual force. If one action feels fiddly during a short trial, it will become a costly bottleneck at scale.
- Make several samples, not just one, to reveal variation.
- Measure packing time for trained and untrained operators.
- Inspect artwork around folds, glue areas, and formed edges.
- Check whether seals, tabs, and closures work after repeated use.
- Pack samples into the intended master carton and pallet pattern.
- Record every change with a revision number and approval date.
Use a design-of-experiments mindset when important variables interact. Change one factor at a time where possible: insert depth, board grade, adhesive position, or clearance. This makes the cause of a failure easier to identify. For complex packages, a 3D scan or CAD interference check can find clashes before a physical revision, but it should support—not replace—the physical sample.
Prototype testing should also include production partners early. A converter can identify a die limitation, forming radius, print registration risk, or tooling constraint that is invisible in a concept presentation. Early technical feedback may lead to a simpler structure with fewer operations and more reliable output.
Finish with a clear release record. Include approved drawings, material specifications, tolerances, pack-out instructions, inspection points, and photographs of the accepted sample. Keep a retained reference unit for future comparisons. This small discipline prevents “almost the same” packaging from entering the line later.
A prototype is successful when it exposes problems cheaply, supports confident decisions, and gives production a repeatable target. It is not a miniature marketing object, but the package telling you plainly what will happen next.
Scaling Custom Packaging from Small Runs to Large Orders
Scaling custom packaging requires more than ordering a larger quantity of the same design. The structure, supply plan, quality controls, and cost model must all remain stable as demand changes. A package that works for a pilot run may need different production logic once orders reach tens of thousands.
Small runs are useful for launch tests, regional sales, limited editions, and engineering changes. Digital printing, simple die-cutting, or modular inserts can reduce early tooling expense. These methods may cost more per unit, but they limit exposure when demand is still uncertain. Keep the design adaptable so a successful pilot can move into a more efficient process without a complete redesign.
Before scaling, define the point at which production methods should change. Calculate tooling costs, setup charges, print efficiency, assembly time, storage, and freight together. The lowest unit price is not always the lowest total cost. A useful model compares the full landed cost at several volumes, such as 500, 5,000, 50,000, and 500,000 units.
- Set a target cost per packed unit for each volume tier.
- Separate one-time tooling from recurring manufacturing costs.
- Estimate scrap, overage, storage, and replacement stock.
- Reserve capacity for demand peaks and product launches.
- Define approval rules before artwork or materials change.
Large orders need disciplined material planning. Confirm lead times for board, paper, films, adhesives, inks, and specialist finishes. One missing component can stop the whole line. Where practical, qualify an equivalent material or a second source before the first major run.
Use a master specification for every version. It should link the product code, packaging code, revision level, approved artwork, material grade, dimensions, packing method, and inspection criteria. Version control matters even more when several sizes share a visual system. A wrong label on a correct box can still create returns, picking errors, or compliance problems.
Quality control should grow with volume. Define checks for print registration, colour, dimensions, closure function, insert position, barcode scanning, and packed weight. Use sampling plans that reflect the risk of failure, not just the convenience of inspection. For critical components, consider full verification of identity or fit at the packing station.
Plan inventory around product velocity. Fast-moving items may justify scheduled blanket orders, while slow variants should use smaller releases to avoid obsolete stock. Store packaging flat where possible, protect it from moisture, and track ageing for adhesives, coatings, and sensitive materials. A crowded warehouse can quietly erase the savings of a bulk purchase.
The strongest scale-up path is staged: prove demand, stabilise the specification, optimise the manufacturing method, then increase volume with measured controls. That approach keeps custom packaging flexible without letting every new order become an expensive experiment.
Planning Sustainable, Reusable, and Efficient Packaging
Sustainable hardware packaging starts with the complete life cycle, from raw material and production to transport, use, and disposal. A package is not automatically sustainable because it contains recycled content. Its total material use, recycling route, durability, and transport efficiency all matter.
Reduce material before replacing material. Remove unnecessary layers, oversized panels, duplicate sleeves, and decorative components that add little function. A smaller package can reduce board consumption, warehouse space, and freight emissions at the same time. Measure the packed volume against the product volume; excess air is often the quietest source of waste.
Choose materials by the product and the local recovery system. Fibre-based packs are widely useful, but coatings, plastic windows, foams, tapes, and mixed laminates can make separation harder. If a plastic component is necessary, use a clearly identified material where practical and avoid bonding it permanently to a different material without a strong reason.
Design for recycling at the end of use. Keep labels, adhesives, inks, and finishes compatible with the intended recycling stream. Avoid dark carbon-based inks where they can interfere with optical sorting. Do not make broad environmental claims without evidence; terms such as “recyclable” depend on collection and processing access in the target market.
Reuse can be valuable when the package survives useful cycles. A rigid case, metal tin, or durable return pack may protect tools between jobs, store spare parts, or support service operations. Reuse should have a clear purpose. If a container is too bulky, difficult to close, or costly to return, customers may discard it after one use.
- Design a durable closure that works without excessive tape.
- Use replaceable inserts when the outer case can serve several product versions.
- Add a practical second life, such as workshop storage or parts sorting.
- Mark material types and disposal guidance in the destination market’s language.
- Track damage and return rates before claiming that a reusable format performs better.
Efficiency also comes from packaging operations. Flat-packed cartons reduce storage volume. Nestable trays use warehouse space more effectively. Fewer pack components simplify picking and reduce assembly errors. A common footprint across a product range can improve pallet use, but do not force every product into one box if the result creates excess void space.
For exports, review extended producer responsibility rules, packaging taxes, and labelling duties before launch. Requirements vary by jurisdiction and change over time. Verify current obligations with the relevant national authority or an accredited compliance adviser.
Use a simple scorecard for decisions: material mass, recycled content, recycled output, packed volume, reuse potential, production waste, and expected service life. This creates a clearer comparison than a single green claim. The best solution is often modest, repairable, easy to sort, and efficient to ship.
Conclusion: Build a Protective, Brand-Focused Hardware Package and Request a Quote
A strong hardware package ends with a clear business decision: define the product’s risks, choose the right structure, and make the brand easy to recognise without sacrificing practical use. The final design should support purchasing, packing, transport, storage, and customer confidence as one connected system.
Before requesting a quote, prepare a concise project brief. Include product samples or accurate CAD files, packed and unpacked dimensions, product weight, sales channels, target markets, forecast volume, expected launch date, and any required certifications or markings. Add photographs of similar products only as reference; they should not replace precise technical data.
- Product name, version, and intended application
- Required package quantity and estimated annual demand
- Preferred format, if one has already been selected
- Brand artwork, colour references, and content requirements
- Shipping destinations and expected handling conditions
- Budget range, tooling expectations, and approval deadline
A quote should make more than the unit price visible. Ask for a breakdown of tooling, sampling, artwork preparation, production, packing, freight, storage, and any setup fees. Confirm lead times, payment terms, minimum order quantities, sample ownership, and the process for approving revisions. Prices depend on the final specification, so an early estimate should be treated as a planning figure rather than a promise.
For a tailored hardware packaging project, PakFactory lists folding cartons, corrugated packaging, rigid boxes, inserts, displays, labels, bags, and metal tins among its available categories. Its options library covers materials, structural choices, and finishing features. The company also states that it can support tariff-impact planning. Details such as dimensions, pricing, construction, and minimum quantities require a project-specific quotation.
Requests can be submitted through the My Quote service. PakFactory lists 1-888-622-2819 as its telephone number and gives opening hours of 9:30 a.m. to 6:30 p.m. EST. Confirm current contact details, scope, and commercial terms directly before placing an order.
Whether the result is a corrugated shipping box, a premium rigid case, or a compact retail format, the goal remains the same: protect the hardware, explain its value, and make every interaction feel intentional. A well-prepared brief turns that goal into a package that can be designed, priced, tested, and produced with fewer surprises.
Frequently Asked Questions About Hardware Packaging Design
What should effective hardware packaging accomplish?
Effective hardware packaging should protect the product during transport and storage, keep components organised, provide easy access, and communicate essential information such as product type, size, quantity, compatibility, and handling requirements.
Which packaging format is suitable for hardware products?
The suitable format depends on product weight, shape, fragility, sales channel, and shipping conditions. Folding cartons suit light accessories, corrugated boxes protect heavier products, rigid boxes support premium tool sets, while trays, blisters, and clamshells work well for organised or highly visible smaller components.
How can inserts improve hardware packaging?
Inserts create dedicated spaces for tools, parts, kits, and electronics. They prevent movement, protect surfaces from scratches, separate accessories, make contents easier to identify, and help users repack products after opening.
How can hardware packaging be made more sustainable?
Sustainable hardware packaging can reduce excess material and empty space, use recyclable or recycled-content materials, avoid unnecessary mixed-material components, improve shipping efficiency, and support practical reuse where the package can withstand repeated use.
What information is needed to request a hardware packaging quote?
A packaging quote normally requires product dimensions, weight, shape details, product samples or CAD files, expected order volume, sales channels, target markets, preferred packaging format, artwork requirements, shipping conditions, budget expectations, and the desired launch date.